
| 일 | 월 | 화 | 수 | 목 | 금 | 토 |
|---|---|---|---|---|---|---|
| 1 | ||||||
| 2 | 3 | 4 | 5 | 6 | 7 | 8 |
| 9 | 10 | 11 | 12 | 13 | 14 | 15 |
| 16 | 17 | 18 | 19 | 20 | 21 | 22 |
| 23 | 24 | 25 | 26 | 27 | 28 | 29 |
| 30 | 31 |
- Kadane's Algorithm
- R
- heroku
- 자바입력
- JAVA11
- 수학
- array
- 자바 thread 실행 순서 제어
- Easy
- input
- SpringBoot 2
- scanner
- hash table
- 자바 스레드 실행 순서 제어
- 카데인 알고리즘
- 사칙연산
- Today
- Total
DeFacto-Standard IT
자바 Thread 실행 순서 제어 - Thread.join() 분석 본문
멀티 스레드 프로그래밍 환경에서는 멀티 스레드에 대한 실행 순서를 제어하는 것이 중요하다.
OS는 멀티 스레드에 대한 실행한 순서를 보장하지 않는다.
따라서 운이 좋으면(?) 맨 마지막에 호출된 스레드가 맨 먼저 실행될 수도 있고,
운이 나쁘면(?) 맨 처음에 호출된 스레드가 맨 나중에 실행될 수도 있다.
물론 멀티 스레드를 제어하지 않는 경우도 있지만,
앞단에서 구한 결과를 가지고 뒷단에서 다시 재처리를 하는 경우라던가 할 때, 앞단의 작업이 끝나기도 전의 뒷단의 작업이 실행된다면 제대로 된 값을 구할 수 없거나 에러가 날 것이다.
먼저 실행 순서를 제어를 위해 커스텀 스레드를 정의하자.
public class CustomThread implements Runnable {
    @Override
    public void run() {
        System.out.print(Thread.currentThread().getName() + " ");
    }
}
스레드의 실행 내용은 현재 실행 중인 스레드의 이름(Thread.currentThread().getName())을 출력하는 것이다.
참고로 스레드는 만들어질 때 마다 기본적으로 Thread-0, Thread-1, ... , Thread-n 이라는 이름을 가지게 된다.
위에서 정의한 커스텀 스레드 객체를 5개를 만든 후, 별도의 처리 없이 순서대로 실행시켜보자.
이 때, Thread.run()이 아닌 Thread.start()를 호출해서 스레드 객체가 만들어지도록 해야 한다.
Thread.run()은 로직을 1번만 수행할 뿐 스레드 객체를 만들지 않는다.
public class Main {
    public static void main(String[] args) {
        Thread thread1 = new Thread(new CustomThread());
        Thread thread2 = new Thread(new CustomThread());
        Thread thread3 = new Thread(new CustomThread());
        Thread thread4 = new Thread(new CustomThread());
        Thread thread5 = new Thread(new CustomThread());

        thread1.start();
        thread2.start();
        thread3.start();
        thread4.start();
        thread5.start();

    }
}
다음 사진은 위 로직을 5회 실행시킨 출력결과다.
앞으로 모든 출력 결과는 운빨방지로 5회 출력하겠다.

만약 Thread1~5가 순서대로 호출되어야 한다면
(즉 출력이 'Thread-0 Thread-1 Thread-2 Thread-3 Thread-4'로 고정되어야 한다면)
이를 제어하는 방법이 필요하다.
자바에서는 이를 Thread.join()라는 메서드를 통해 관리할 수 있도록 한다.
Thread.join()이란 한 마디로 '이 Thread.join()이 호출된 스레드가 실행이 완료될 때 까지, 더 이상 Thread.join()을 호출한 스레드가 진행되지 않는다'는 의미이다.
여기서 오해할 여지가 있다. 글자 그대로 해석하고, 확대해석은 금물이다.
1. '이 Thread.join()이 호출된 스레드가 실행이 완료될 때 까지'
만약 thread1.join(); 이라는 코드가 호출됐다면, 여기서의 스레드는 'thread1'이 된다.
즉, 'thread1의 실행이 완료될 때 까지'라는 뜻이다.
2. '더 이상 Thread.join()을 호출한 스레드가 진행되지 않는다'
thread1.join()을 호출하는 코드가 있는 스레드를 의미한다.
위 예제에서는 Main.main()을 의미한다.
일반적으로 'Main Thread'라고도 한다.
즉, 'main()은 더 이상 진행을 하지 않는다'는 뜻이다.
그렇기 때문에 새로운 thread.start()를 수행할 수 없는 것이다.
이에 대한 내용은 아래에서 Thread.join()의 소스코드를 까보면서 다시 다룬다.
어쨌든, join()이 호출된 스레드가 끝나야(더 이상 작업할 내용이 없어서 스레드가 더 이상 살아있는 상태가 아니어야) 다음 스레드를 start()한다는 것만 우선 지금은 기억하자.
이제 join()을 사용해서 호출 순서를 제어해보자.
다음과 같이 Main함수를 수정해보자.
public class Main {
    public static void main(String[] args) {
        Thread thread1 = new Thread(new CustomThread());
        Thread thread2 = new Thread(new CustomThread());
        Thread thread3 = new Thread(new CustomThread());
        Thread thread4 = new Thread(new CustomThread());
        Thread thread5 = new Thread(new CustomThread());


        try {
            thread1.start();
            thread2.start();
            thread3.start();
            thread4.start();
            thread5.start();

            thread1.join();
            thread2.join();
            thread3.join();
            thread4.join();
            thread5.join();
        } catch (InterruptedException e) {
            e.printStackTrace();
        }

    }
}
Thread.join()은 InterruptedException을 발생시킨다.
InterruptedException은 Exception 클래스를 상속받으므로 Checked Exception이다.
따라서 예외 처리 코드(try-catch)가 들어가야 한다. (혹은 throws 키워드를 메서드에 달아주도록 한다.)
참고로 RuntimeException을 상속하는 예외들은 Unchecked Exception이라고 하며, 이러한 예외 처리 코드가 없어도 컴파일 오류가 나지 않는다.
나는 그냥 try-catch를 쓰겠다.
try-catch문 안에 Thread.join()을 1,2,3,4,5 순서로 호출했다.
thread1,2,3,4,5 를 순서대로 동작하도록 기대할 것이다.
결과는 다음과 같다.

Thread.join()을 썼는데도 그냥 start()만 5번 돌린 것과 크게 다를 것이 없어보인다.
위와 같이 출력되는 이유는 thread.start()를 한번에 모두 수행했기 때문이다.
즉, join()이 실행되기 전 이미 스레드를 모두 start()했기 때문이다.
(즉, main()에서는 이미 5개의 스레드를 모두 실행 시킨 후 join()을 통해 대기하기 때문이다.)
이것이 맞다면 뭔가 잘못된 방식으로 사용하고 있는 것이며, 소스를 수정해야 한다.
다시 다른 방식으로 사용해보자.
다음과 같이 Main함수를 변경해보자.
public class Main {
    public static void main(String[] args) {
        Thread thread1 = new Thread(new CustomThread());
        Thread thread2 = new Thread(new CustomThread());
        Thread thread3 = new Thread(new CustomThread());
        Thread thread4 = new Thread(new CustomThread());
        Thread thread5 = new Thread(new CustomThread());

        try {
            thread1.start();
            thread1.join();

            thread2.start();
            thread2.join();

            thread3.start();
            thread3.join();

            thread4.start();
            thread4.join();

            thread5.start();
         // thread5.join();
        } catch (InterruptedException e) {
            e.printStackTrace();
        }

        System.out.println("End of Main");

    }
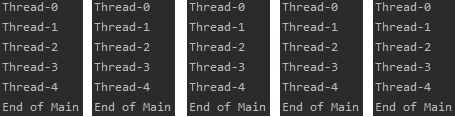
CustomThread의 print()를 println()으로 대체 후 출력하면 다음과 같다.

thread1~5 까지의 실행 순서가 보장된 것을 알 수 있다.
이를 통해, join()으로 스레드의 순서를 제어하기 위해서는
특정 thread의 start()가 호출되기 전에, 선행 thread.join()을 실행해야 한다는 점을 알 수 있다.
(thread2.start()가 호출되기 전에, 선행 thread1.join()을 실행해야 Thread1 -> Thread2 순서로 진행된다.)
단, thread5.join()을 호출하지 않았기 때문에 Main의 마지막 라인이 먼저 출력됐다.
즉, thread5를 start()시킨 이후, thread5 객체가 실제 프린트를 찍는 것 보다 Main의 마지막 라인을 실행하는 속도가 더 빠름을 의미한다.
thread5.join()까지 호출해주면 제대로 출력된다.
그 이유는, main()에서 thread5.join()을 실행했다면, thread5의 실행이 끝날 때 까지 main()의 코드는 실행되지 않기 때문이다.
위 Main 함수를 정리하면 다음과 같다. 출력 결과는 동일하니 생략하겠다.
public class Main {
    public static void main(String[] args) {
        for (int i = 0; i < 5; i++) {
            Thread thread = new Thread(new CustomThread());
            thread.start();
            try {
                thread.join();
            } catch (InterruptedException e) {
                e.printStackTrace();
            }
        }

        System.out.println("End of Main");

    }
}
그렇다면 한 가지를 더 생각해볼 필요가 있다.
아까 join()에 대해서 설명하기 전, 예제로 start() 연속 5번, join() 연속 5번을 호출했을 때, start()만 5번 실행한 것과 같이 순서가 제어되지 않는 호출 순서를 볼 수 있었다.
또한, 스레드의 실행 순서를 제어하고 싶을 땐, 제어하고 싶은 스레드의 순서를 나열하여 start()를 호출하고, 그 사이에 join()을 껴 넣으면 순서의 실행이 보장됐다.
join()은 해당 스레드의 실행이 종료될 때 까지 join()을 호출한 로직의 실행을 멈추기 때문이다.
이 글의 초반부에서 전처리와 후처리를 예로 들었는데, 위 정보를 사용해 응용해보자.
만약 스레드 5개 중 앞에서 실행되는 3개는 전처리 작업을 수행하는 스레드로,
나머지 2개는 후처리 작업을 수행하는 스레드로서 동작하도록 해보자.
단, 전처리 스레드끼리는 동시성을 신경 쓸 필요가 없으며,
후처리 스레드끼리 역시 동시성을 신경 쓸 필요가 없다.
하지만 반드시 전처리 스레드가 모두 처리된 후 후처리 스레드가 시작되어야 한다.
스레드 1,2,3을 start()한 후, 스레드 1,2,3에 대해 join()을 걸고,
스레드 4, 5에 대해 start()를 수행하면 된다.
그래야만 전처리 스레드(1,2,3)가 모두 수행이 완료된 다음 main()메서드가 다시 진행되어 후처리 스레드(4,5)가 수행이 완료될 것이기 때문이다.
여기서 만약 1,2,3 중 하나라도 join()을 실행하지 않는다면, 전처리 스레드 중 하나라도 작업을 끝내지 못한 채로 스레드 4, 5가 수행될 가능성이 있다.
만약 join()을 하나의 스레드에만 걸었는데, 마침 이 스레드가 가장 늦게 작업이 끝난다면,
운좋게 전처리 스레드가 전부 처리된 후에 후처리 스레드가 실행될 것이지만,
이러한 생각은 절대 하면 안된다.
한마디로 '운'이기 때문이다.
따라서 전처리 스레드 모두 join()을 거는 것이 좋겠다.
성능은 크게 걱정할 필요 없다. 어차피 가장 오래걸리는 전처리 스레드는 기달려야 하고, 다른 전처리 스레드는 이미 수행이 끝났기 때문이다.
물론 성능 상 아주 약간의 오버헤드는 존재한다.
만약 thread1.join(), thread2.join(), thread3.join()문장을 차례대로 호출하고, thread1이 가장 늦게 끝난다고 가정해보자.
이후 thread2,3은 이미 끝났으므로 스레드가 죽었는지 살았는지 체크하게 된다.
이 때 이미 작업이 끝나고 스레드가 죽어있으므로 다음 로직을 수행할 것이다.
지금까지 설명한 작업을 소스코드로 표현해보자.
그 전에, 0으로 시작하는 인덱스로 표현하면 불편하니, 애초에 스레드에 번호를 부여해서 실행하자.
다음은 번호를 부여받는 CustomThread다.
작업은 0.1초 (100ms)를 기다린 후 부여된 번호를 출력한다.
public class CustomThread implements Runnable {
    private int number;

    public CustomThread(int number) {
        this.number = number;
    }

    @Override
    public void run() {
        try {
            Thread.sleep(100);
        } catch (InterruptedException e) {
            e.printStackTrace();
        }
        System.out.println(number);
    }
}
이제 Main을 작성해보자.
위에서 말했듯이 Thread.join()은 Check Exception이므로 try-catch로 감싸거나 호출하는 메서드(main())에 'throws 익셉션'을 붙여야 한다.
try-catch는 가독성이 떨어지므로 이번에는 throws를 붙여 가독성을 챙겨보자.
public class Main {

    public static void main(String[] args) throws InterruptedException {
        Thread thread1 = new Thread(new CustomThread(1));
        Thread thread2 = new Thread(new CustomThread(2));
        Thread thread3 = new Thread(new CustomThread(3));
        Thread thread4 = new Thread(new CustomThread(4));
        Thread thread5 = new Thread(new CustomThread(5));

        thread1.start();
        thread2.start();
        thread3.start();

        thread1.join();
        thread2.join();
        thread3.join();

        thread4.start();
        thread5.start();

        thread4.join();
        thread5.join();
    }
}
총 10번 수행한 실행 결과는 다음과 같다.
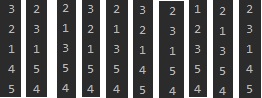
처음 수행된 3개의 전처리 스레드는 1,2,3 중 하나이고
마지막에 수행된 2개의 후처리 스레드는 4,5 중 하나이며 이를 항상 보장한다.
전처리 스레드끼리의 동시성은 신경쓰지 않으며,
후처리 스레드끼리의 동시성은 신경쓰지 않았다.
적절히 구현됐다.
만약 여기까지 이해가 됐다면, 다음은 어떻게 동작하는지 살펴보자.
다음 예제를 보고 실행 순서를 살펴보자.
CustomThread는 변경이 없지만, 휠을 올리기 불편하므로 다시 한번 보자. (바로 위의 CustomThread와 동일)
public class CustomThread implements Runnable {
    private int number;

    public CustomThread(int number) {
        this.number = number;
    }

    @Override
    public void run() {
        try {
            Thread.sleep(100);
        } catch (InterruptedException e) {
            e.printStackTrace();
        }
        System.out.println(number);
    }
}
다음은 새롭게 작성된 Main이다.
스레드객체의 생성은 1~5까지 순서대로 생성 하되(start가 아니라 new), 여러 스레드의 start()와 join()이 마구 섞여있다.
단, 특정 스레드는 반드시 start()부터 불린 후에 join()이 불린다.
예를 들어 thread1.join()이 먼저 실행된 후 thread1.start();가 실행되는 경우는 없다.
이 때 출력은 어떠한 식으로 될까?
public class Main {

    public static void main(String[] args) throws InterruptedException {
        Thread thread1 = new Thread(new CustomThread());
        Thread thread2 = new Thread(new CustomThread());
        Thread thread3 = new Thread(new CustomThread());
        Thread thread4 = new Thread(new CustomThread());
        Thread thread5 = new Thread(new CustomThread());

        thread5.start();
        thread3.start();
        thread1.start();
        thread3.join();
        thread2.start();
        thread1.join();
        thread4.start();
        thread2.join();
        thread4.join();
        thread5.join();
    }
}
아래는 출력 결과다.

먼저 설명을 해보자면 다음과 같다.
runnable : '실행되고 있을 수도' 있는 스레드
complete : 실행이 완전히 끝난 스레드
not started : 아직 실행이 안된 스레드
1. thread 5, 3, 1 .start() : 5, 3, 1스레드가 생성되어 돌 것
- runnable : 1, 3, 5 / complete : - / not started : 2, 4
2. thread3.join() : main()은 실행을 멈추고 thread3이 끝날 때 까지 기다릴 것.
이 때, 스레드 1, 5는 이미 start()됐으므로 계속 수행중일 수도 있음
- runnable : 1, 5 / complete : 3 / not started : 2, 4
3. thread2.start() : 스레드 2가 수행
- runnable : 1, 2, 5 / complete : 3 / not started : 4
4. thread1.join() : main()은 실행을 멈추고 thread1이 끝날 때 까지 기다릴 것
이 때, 스레드 2, 5는 이미 start()됐으므로 계속 수행중일 수도 있음
- runnable : 2, 5 / complete : 1, 3 / not started : 4
6. thread4.start() : 스레드 4가 수행
- runnable : 2, 4, 5 / complete : 1, 3
7. thread2.join() : main()은 실행을 멈추고 thread2가 끝날 때 까지 기다릴 것
이 때, 스레드 4, 5는 이미 start()됐으므로 계속 수행중일 수도 있음
- runnable : 4, 5 / complete : 1, 2, 3
8. thread4.join() : main()은 실행을 멈추고 thread4가 끝날 때 까지 기다릴 것
이 때, 스레드 5는 이미 start()됐으므로 계속 수행중일 수도 있음
- running : 5 / complete : 1, 2, 3, 4
9. thread5.join() : main은 실행을 멈추고 thread5가 끝날 때 까지 기다릴 것
모든 스레드가 종료됨
- complete : 1, 2, 3, 4, 5
우선 각 소스코드의 라인에 대한 설명은 위와 같다.
위에서 runnable은 실행할 '가능성'이 있는 스레드일 뿐이다.
CustomThread에서 기다리는 시간은 0.1초 (100ms)로 동일하기 때문에, 어떤 것이 먼저 끝날지 모른다.
특히 thread5의 경우 가장 먼저 실행되지만 join()은 가장 늦게 시작한다.
실제로 100ms정도로 맞추고 돌려보면
스레드 1, 3, 5는 거의 항상 앞에 3개에 출력되며
스레드 2, 4는 거의 항상 뒤에 2개에 출력된다.
그래서 마치 앞에서 설명했던 '전처기3개, 후처리2개'와 동일해 보인다.
하지만 이렇게 확정지을 수 없다.
일반적으로 스레드가 하는 작업은 시간이 동일하지 않다.
스레드 전부 처리속도가 10ms, 1000ms, 100000ms 로 전부 다를 수도 있다는 말이다.
위 예제를 살짝 고쳐보자.
먼저 타이머 스레드를 새로 만들자.
public class TimerThread implements Runnable {

    @Override
    public void run() {
        int waiting = 0;

        while (true) {
            System.out.println(waiting++ + "초");
            try {
                Thread.sleep(1000);
            } catch (InterruptedException e) {
                break;
            }
        }

    }
}
Thread.interrupt()를 실행하면 InterruptedException이 난다.
따라서 main()에서 interrupt()를 수행하면 catch문의 break;에 의해 while문을 빠져나가 종료하게 된다.
CustomThread는 시간을 지정할 수 있게 고친다.
public class CustomThread implements Runnable {
    private int number;
    private int millis;

    public CustomThread(int number, int millis) {
        this.number = number;
        this.millis = millis;
    }

    @Override
    public void run() {
        try {
            Thread.sleep(millis);
        } catch (InterruptedException e) {
            e.printStackTrace();
        }
        System.out.println(number);
    }
}
그리고 Main의 start(), join()코드는 그대로 두고, 각 스레드에 시간만 다르게 지정한다.
시간 단위는 초단위, 즉 1000ms 단위로 지정하겠다.
public class Main {

    public static void main(String[] args) throws InterruptedException {
        Thread timer = new Thread(new TimerThread());
        timer.start();

        Thread thread1 = new Thread(new CustomThread(1, 3000 ));
        Thread thread2 = new Thread(new CustomThread(2, 10000));
        Thread thread3 = new Thread(new CustomThread(3, 6000 ));
        Thread thread4 = new Thread(new CustomThread(4, 3000 ));
        Thread thread5 = new Thread(new CustomThread(5, 10000));

        thread5.start(); // 10초 실행
        thread3.start(); // 6초  실행
        thread1.start(); // 3초  실행
        thread3.join();
        thread2.start(); // 1초  실행
        thread1.join();
        thread4.start(); // 3초  실행
        thread2.join();
        thread4.join();
        thread5.join();

        timer.interrupt();
    }
}
출력 결과는 다음과 같다.

시간을 다르게 주고 실행하니 전혀 다른 결과가 나왔다.
100ms로 동일한 시간으로 돌렸을 때는 1,3,5 가 앞쪽에, 2,4가 뒤쪽에 나왔지만
작업시간이 달라지니 전혀 순서가 다르다.
따라서, 완전히 랜덤한 작업일 때 보장되는 작업 순서는 join()이 호출되는 순서인 3 -> 1 -> 2 -> 4 -> 5이다.
위와 같은 결과는 시간에 따라 결과가 다르게 나온 것이다. 즉, 운이었던거다.
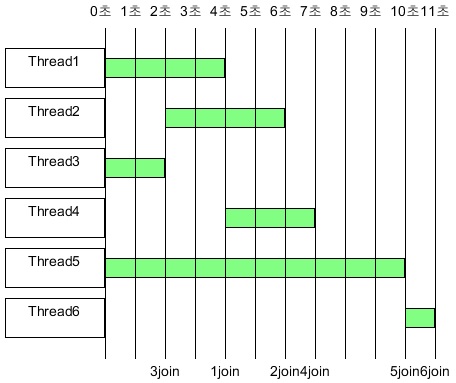
만약 아래와 같이 스레드 별 작업시간이 달라진다면, join()의 호출 순서에 따라 작업 순서가 보장된다.
public class Main {

    public static void main(String[] args) throws InterruptedException {
        Thread timer = new Thread(new TimerThread());
        timer.start();

        Thread thread1 = new Thread(new CustomThread(1, 4000 )); // 4초
        Thread thread2 = new Thread(new CustomThread(2, 4000 )); // 4초
        Thread thread3 = new Thread(new CustomThread(3, 2000 )); // 2초
        Thread thread4 = new Thread(new CustomThread(4, 3000 )); // 3초
        Thread thread5 = new Thread(new CustomThread(5, 10000)); // 10초
        Thread thread6 = new Thread(new CustomThread(6, 1000 )); // 1초

        thread5.start();
        thread3.start();
        thread1.start();
        thread3.join();
        thread2.start();
        thread1.join();
        thread4.start();
        thread2.join();
        thread4.join();
        thread5.join();
        thread6.start();
        thread6.join();

        timer.interrupt();
    }
}
6번 스레드가 추가된 예제의 스레드별 진행 과정을 그림으로 나타내면 다음과 같다.
그렇다면 이제 Thread.join()의 소스코드를 뜯어보자.
java.lang.Thread의 join()은 3개의 메서드로 오버로딩되어있다.
    public final synchronized void join(final long millis)
    throws InterruptedException {
        if (millis > 0) {
            if (isAlive()) {
                final long startTime = System.nanoTime();
                long delay = millis;
                do {
                    wait(delay);
                } while (isAlive() && (delay = millis -
                        TimeUnit.NANOSECONDS.toMillis(System.nanoTime() - startTime)) > 0);
            }
        } else if (millis == 0) {
            while (isAlive()) {
                wait(0);
            }
        } else {
            throw new IllegalArgumentException("timeout value is negative");
        }
    }


    public final synchronized void join(long millis, int nanos)
    throws InterruptedException {

        if (millis < 0) {
            throw new IllegalArgumentException("timeout value is negative");
        }

        if (nanos < 0 || nanos > 999999) {
            throw new IllegalArgumentException(
                                "nanosecond timeout value out of range");
        }

        if (nanos > 0 && millis < Long.MAX_VALUE) {
            millis++;
        }

        join(millis);
    }


    public final void join() throws InterruptedException {
        join(0);
    }
위 2개는 join()동안 기다릴 시간을 파라미터로 지정하는 것이다.
만약 선행 스레드가 종료되기 까지 join()에 의해 너무 오랜 시간이 걸릴 경우, 기다리는 시간에 대한 상한선을 지정한다.
맨 아래의 join()은 예제로 쓰인 메서드이다.
반드시 선행 작업이 끝나야만 이후 작업을 수행할 수 있을 때 사용한다.
주의할 점은 해당 스레드가 끝날 때 까지 무한히 대기하므로, 스레드 작성 시 무한루프가 걸리지 않게 해야 한다.
내부적으로 join(0);을 호출하므로 결국 오버로딩되어 있는 다른 메서드를 봐야 한다.
join(0);은 오버로딩 된 메서드 중 가장 첫 번째 메서드를 호출한다.
이중 millis 변수가 0인 경우의 코드는 다음과 같다.
else if (millis == 0) {
    while (isAlive()) {
        wait(0);
    }
}
isAlive라는 메서드가 true를 리턴하면 (즉, 스레드가 살아 있으면)
wait(0);이라는 메서드가 호출된다.
이 2개 메서드는 java.lang.Thread에 정의되어 있는 native메서드다.
즉, JNI로서 소스코드를 볼 수가 없다.
join()을 호출한 main()함수가 멈춘다고 말한 것은, Thread.join()이 내부적으로 isAlive()를 통해 계속해서 스레드의 상태를 확인하며 isAlive()가 false를 리턴할 때 까지 (해당 스레드가 죽은 상태가 될 때 까지) 루프를 돌기 때문이다.
------------내용 추가
Thread가 살아있는지의 여부(isAlive() == true))와
Thread가 작업단위를 마쳤는지의 여부를 구분해야 한다.
Thread.join()은 특정 스레드가 완전히 종료될 때 까지 기다린다.
즉, 더 이상 작업거리가 없어서 스레드의 run() 메서드의 끝에 도달하는 것이 스레드의 종료 조건이다.
만약 Thread가 10개의 작업(task)을 해야한다고 치자.
main스레드에서 Thread.join()을 걸면 Thread의 task 10개가 모두 수행하고 종료될 때 까지 join()은 풀리지 않아 main스레드는 계속 기다린다.
왜냐하면 Thread는 중간에 오류가 나거나 특정 조건에 의해 종료되지 않는 이상, task 10개를 모두 수행해야만 자신의 역할을 다 하고 끝나는 것이기 때문이다.
만약 task단위로 스레드를 제어하고 싶다면 wait()와 notify()를 사용해 스레드를 제어해야 한다.
예를 들어서 Thread1과 Thread2가 서로 번갈아 가면서 작업을 하는 경우는 wait(), notify()를 사용해야만 가능하며 join()만으로는 불가능하다.
Thread2에서 thread1.join()을 걸면, Thread1이 완전히 수행되고 더 이상 수행되지 않을 때 까지 thread2는 작업을 수행하지 않기 때문이다.
만약 join()만을 사용해서 제어해야 한다면, Thread1, 2에 추가적으로 Thread1의 일을 똑같이 수행하는 Thread3을 별도로 만들어서 처리해야 한다.
또한 Thread1의 작업이 어디까지 진행됐는지 그 상태와 중간 결과를 따로 저장해야 하는 메커니즘을 구현해야 하므로 더욱 복잡해질 것이다.
또한 객체를 불필요하게 생성, 반납하게 되므로 wait(), notify()를 사용하도록 하자
'Java > References' 카테고리의 다른 글
| jackson-databind Polymorphic Serialization / Deserialization (2) - 3-Depth (2) | 2019.03.13 |
|---|---|
| jackson-databind Polymorphic Serialization / Deserialization (1) - 2-Depth (4) | 2019.03.10 |
| [JAVA] Method Signature, Method Type, Method Reference (0) | 2018.05.01 |
| [JAVA] Static Method Dispatch, Dynamic Method Dispatch, Double Dispatch (0) | 2018.05.01 |
| Java의 특징 (0) | 2017.11.15 |

